
Ask any experienced end of tenancy cleaner which single item causes the most check-out disputes, and the answer is almost always the same: the oven. It is not the bathroom grout, not the limescale on the taps, not even the mystery stain on the bedroom carpet. It is the oven – every time. The good news is that a professional tenancy clean brings a very specific set of tools, techniques, and standards to the job, and the result is something an inventory clerk or landlord can sign off without hesitation. Here is exactly how it is done.
Why the Oven Is the Make-or-Break Item on Any Check-Out Inventory
Baked-on grease is honest. Unlike dust, which can be shifted in twenty minutes with a cloth, carbonised fat and food residue on oven surfaces is cumulative – it builds up over months and resists anything short of a dedicated, methodical clean. Inventory clerks know this, which is why they look at the oven early and look at it closely.
In the Royal Borough of Kensington and Chelsea, the stakes are higher than in most London postcodes. Properties in W8, SW3, SW7, and SW10 tend to be high-value, and the letting agents and inventory companies that operate in the area are experienced professionals who carry check-in photographs and written condition reports. They know precisely what the oven looked like at the start of the tenancy, and they will compare it against what they find at check-out with considerable care. A failed oven clean is one of the most common grounds for a deposit deduction – and one of the most avoidable.
The Professional’s Toolkit – What We Bring That You Don’t Have Under the Sink
Caustic vs. Non-Caustic Degreasers – Choosing the Right Weapon
The cleaning products available in supermarkets are formulated for regular domestic maintenance – light grease, recent spills, surfaces that are cleaned weekly. They are not designed for the accumulated carbonised residue of a tenancy that may have run for one, two, or three years without a proper deep clean.
Professional tenancy cleaners work with two main chemical families. Caustic degreasers – typically sodium hydroxide-based – are powerful enough to break down heavy carbonisation on steel, cast iron, and vitreous enamel surfaces. Non-caustic alternatives use a different chemical action and are used on continuous-clean liners, aluminium components, and any surface where a caustic formula could cause damage. Choosing the wrong product does not just risk leaving the oven dirty – it risks damaging it, which creates a very different kind of deposit conversation.
The Soaking Kit and Why Time Is the Real Ingredient
The single most important element of a professional oven clean is one that no spray-and-wipe approach can replicate: dwell time. Removable components – racks, trays, side runners, and any removable door glass panels – are placed into soak trays or heavy-duty sealed bags with an appropriate degreaser solution and left for a controlled period. The chemistry does the work. Attempting to scrub components that have not been properly soaked is slower, less effective, and far more likely to leave residue behind. This is where most DIY attempts fall short – not through lack of effort, but through impatience.
The Step-by-Step Process – How We Actually Do It
Stage 1 – Strip, Assess, and Pre-Treat
Before any cleaning begins, every removable component comes out: wire racks, grill trays, side runners, the base plate, and – where the design allows – the inner door glass panels. This is also the moment to assess what you are dealing with. Light to moderate soiling calls for a different approach and dwell time than a heavily carbonised interior that has not been touched since the tenancy began.
Pre-treatment is applied systematically to interior surfaces – roof, back wall, side walls, floor, and door interior – and to all removed components. A professional will also check the elements that a DIY clean routinely misses: the fan cover at the back of fan-assisted ovens, the area around the door seal (where grease pools and hardens), the roof panel behind the grill element, and the runners on either side where accumulated drips are hidden from casual inspection.
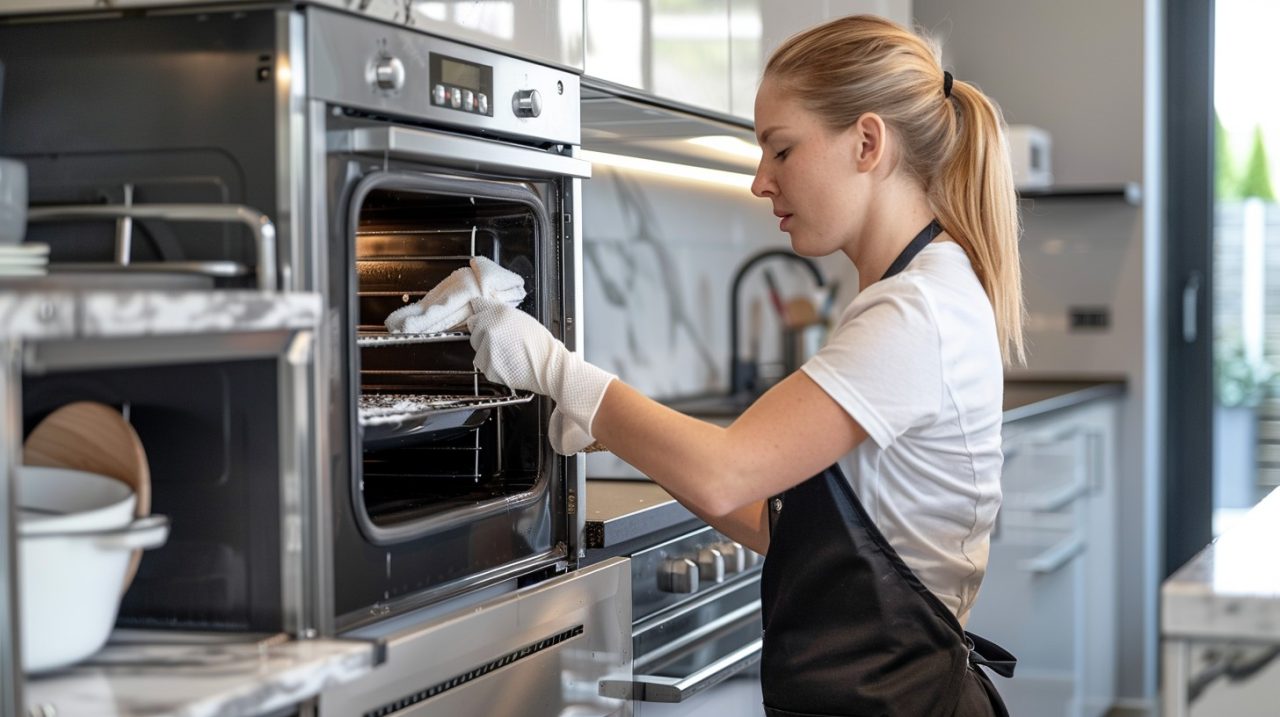
Stage 2 – The Soak and the Interior Scrub
While the removed components soak, the interior is worked through in a deliberate sequence. The standard order is roof first, then back wall, sides, floor, and finally the door interior. Working top-to-bottom prevents re-contaminating surfaces that have already been cleaned.
The tools used at each stage matter. Plastic scrapers remove carbonised deposits without scratching enamel. Nylon scourers handle residue that the scraper leaves behind. Narrow brushes reach into the channels along the base and the recesses around the elements. Each section is wiped clean of both grease and degreaser before moving on. On soaked components, the same logical progression applies – a brief scrub is usually sufficient once the dwell time has done its job, though heavily soiled racks may need a second application.
Stage 3 – The Door Glass (The One That Always Betrays You)
Experienced inventory clerks go straight to the door glass, and for good reason. It is the most visible surface in the oven and the one most likely to reveal a superficial clean. Wiping the inner-facing side of the front glass panel is not enough – in many oven designs, grease migrates between the glass panels over time and is visible as a brown or smoky film that cannot be reached without partial disassembly.
Where the design permits, the door is removed and the glass panels are separated carefully to allow cleaning between them. Where this is not practical, the visible surfaces are cleaned to the highest achievable standard, and the condition is noted. On the outer glass, the technique is streak-free and residue-free: the right cloth, the right finishing product, buffed dry. A smeared oven door fails an inspection just as surely as a dirty one.
Stage 4 – Rinse, Dry, Reassemble, and Final Inspection
Chemical residue left in an oven is both an inspection failure and a safety issue – it will smoke or smell on first use, which is not something a new tenant or returning landlord will miss. Every treated surface is wiped down thoroughly with clean, damp cloths until no trace of degreaser remains. Components are dried before reassembly, because moisture trapped inside an oven is a separate problem.
Reassembly follows the reverse of the strip-out, with each component checked as it goes back in. The final inspection mirrors what an inventory clerk will do: a torch check of the interior from every angle, the door opened and closed to check the seal area, the glass inspected under direct light. If anything needs attention, it is addressed before the clean is signed off – not discovered during the check-out.
What “Landlord Standard” Actually Means in Practice
The phrase causes more anxiety than it should. “Landlord standard” does not mean the oven must look as though it rolled off a production line that morning. It means it should be as clean as it was at the start of the tenancy – that is the legal and practical benchmark, and fair wear and tear is accounted for within that definition.
What matters is that the condition at check-out is at least equal to the condition recorded at check-in – in the written inventory and, increasingly, in photographic records. A professionally cleaned oven is also a documented one: many end-of-tenancy cleaning companies provide a receipt or written confirmation of the work carried out, which gives tenants evidence to present if a deduction is disputed. In a rental market as active and well-documented as RBKC, that piece of paper has genuine value.
The Honest Truth About DIY Oven Cleaning Before a Check-Out
It can be done. A motivated tenant with the right products, sufficient time, and a willingness to spend several hours on their knees can achieve a result that will pass a check-out inspection. The conditions for that outcome are, however, fairly specific: the oven cannot be in a severe state of soiling, the tenant needs access to a proper degreaser rather than a supermarket oven spray, and the clean needs to happen with enough time to do the job thoroughly rather than in a last-minute panic.
Where DIY most commonly fails at check-out is not effort but chemistry and time – the wrong product, insufficient dwell, and an interior that looks clean in ordinary light but reveals residue the moment a torch is applied. A professional clean costs money; a deposit deduction costs more.
Why End-of-Tenancy Cleaning in Kensington and Chelsea Demands Precision
The rental market in RBKC operates at a level where standards are high and expectations are clearly documented. Inventory companies working in this borough are thorough – they are appointed by landlords and agents who expect a detailed report, and they deliver one. A check-out inspection here is not a casual walkthrough.
That context shapes how professional tenancy cleaning should be approached in this part of London. It is not enough to clean to a general standard and hope for the best. The clean needs to be systematic, evidenced, and benchmarked against the original check-in condition. For the oven above all else, that means treating it not as a kitchen appliance to be wiped down, but as the most scrutinised item in the property – and cleaning it accordingly.
The Oven Test – and What Passing It Actually Means
There is an informal rule among experienced inventory clerks: if the oven is clean, the rest of the property usually is too. It is the item that separates a genuine professional clean from a surface tidy. Passing the oven test means something – it means the clean was thorough, methodical, and carried out to a standard that holds up to documentation and scrutiny.
For tenants moving out of a property in Kensington and Chelsea, that distinction is worth taking seriously. The deposit attached to a flat or house in this borough is not an incidental figure, and the oven is one of the most reliable ways to protect it.